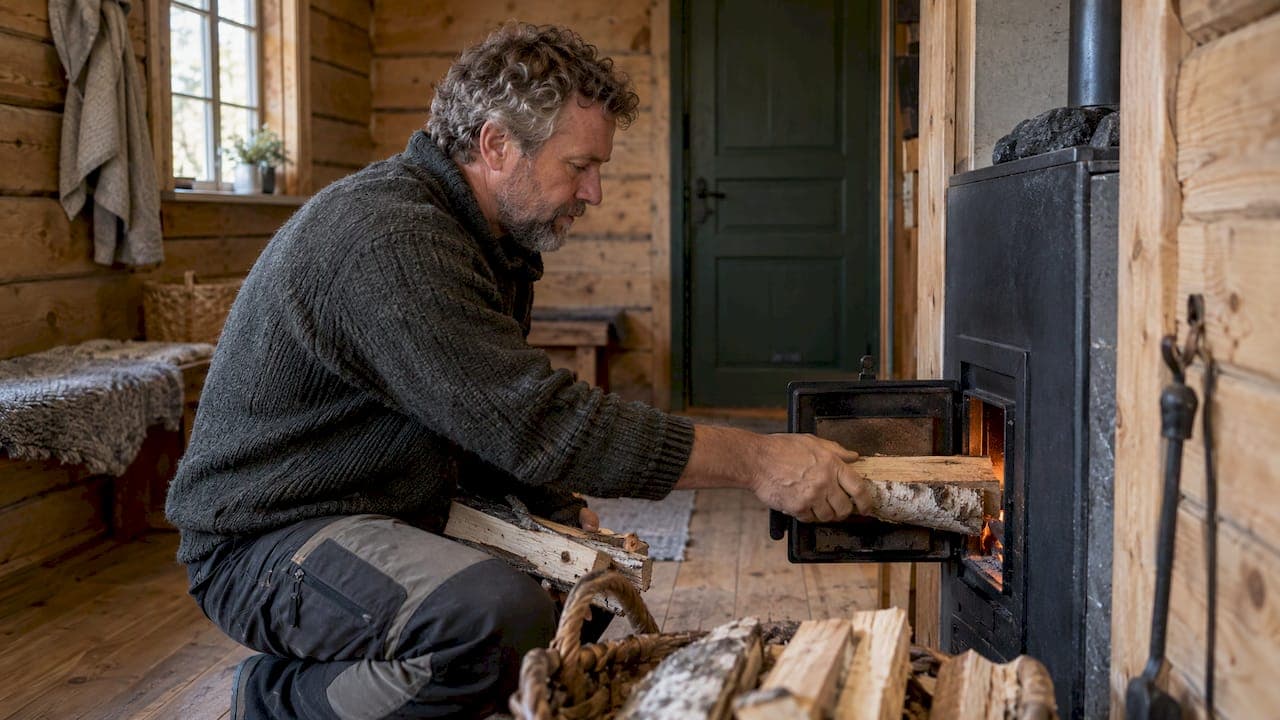
A wood-fired sauna is heated with dry, split wood, burned in small batches with enough air, until the stones hold a steady heat. That usually takes around 40 to 50 minutes, depending on the stove. The rest is a matter of patience: good wood, an airy stack, a gentle fire and a calm hand on the damper. Below we walk through each step, with the Swedish rules on chimneys and ash that matter if you own a sauna or are staying somewhere that has one.
TL;DR
- Use properly dry wood, ideally below 20% moisture and stored dry and ventilated for at least a year.
- Light with kindling, add wood in small batches and fill the firebox no more than about two-thirds.
- Expect roughly 40 to 50 minutes of heating; keep the temperature under 100°C and never burn rubbish.
- In Sweden a new stove installation must be notified to the municipality, and the chimney must suit solid fuel.
- Let the fire die with the door closed, and keep cold ash in a lidded metal container outside.
Table of Contents
- Start with the wood
- Prepare the stove before you light it
- Lighting the fire
- Managing air and heat
- How long does it take?
- Chimney and installation rules in Sweden
- Finishing the evening: embers and ash
- Bathing well once the sauna is hot
- Our perspective
- Stay with us in Bergslagen
- FAQ
- Sources
Start with the wood
Most problems with a wood-fired sauna begin in the woodpile, not in the stove. Damp wood smoulders, produces little heat, blackens the glass and leaves tar in the flue.
Sweden's civil contingencies agency, MSB, advises using dry wood that has been stored dry and ventilated for at least one year, and notes that wet wood is a common cause of tar deposits in the chimney. Stove makers give figures. Narvi recommends moisture below 20% and says hardwood or softwood can be used if it is properly dried and stored. Helo's manual asks for unprocessed wood, preferably birch or alder, at 12 to 20% moisture and about 35 cm long.
In Sweden birch is the natural first choice. Swedish sauna guides describe dry birch as the usual favourite for its clean flame and lasting heat, while spruce and pine burn faster and throw more sparks. If spruce is what you have, use it for kindling and let birch carry the main load.
Size and splitting
Small, well-split pieces catch quickly and burn evenly. The Harvia Cilindro manual specifies logs of about 8 to 12 cm in diameter for the first load and about 12 to 15 cm when adding fuel, and says a couple of logs at a time is enough to keep the temperature up. Check the manual for your own stove, because firebox sizes differ.
A simple moisture check
A cheap moisture meter, pushed into a freshly split face, settles the question. Without one, look for cracks at the ends of the logs, a light weight in the hand and a hollow, ringing sound when two pieces are knocked together. Wood that hisses and weeps sap in the fire is not ready.

Prepare the stove before you light it
A few quiet minutes of preparation make the fire easier and the sauna safer.
- Empty the ash. Remove old ash from the grate and ashpan so air can reach the fire. Narvi's instructions begin with exactly this.
- Check the stones. They should be stacked so air can move between them, not packed tight. Remove anything unnecessary from the stove area and the bench closest to it.
- Open the vents. Open the ventilation as the manual instructs, and the flue damper if your stove has one.
- Lay out the wood. Keep a small stack of dry kindling and a few split logs within reach, but not touching the stove.
If you are planning or renovating a sauna, ventilation and door placement deserve thought before the first fire. A practical overview of sauna ventilation and door placement is a good place to start.
Lighting the fire
There are two sound ways to build the fire, and the manual for your stove decides between them.
Traditional bottom-up. Start with a small amount of kindling, get it burning well, then add wood. Narvi describes adding wood once the fire burns well, until the firebox is about two-thirds full.
Top-down. The Harvia Legend manual recommends larger logs at the bottom, smaller ones above and kindling on top, lit from the top because this produces fewer emissions. Stack the logs loosely, so flames can pass through.

Both approaches share a rule: do not cram the firebox. Finland's regional environmental body HSY advises adding wood in several batches rather than filling the firebox, and supplying enough air as the stove manual allows. A fire that has room to breathe burns cleaner and gives more heat from less wood.
Reading the smoke
Once the fire has caught, glance at the chimney. HSY notes that dark or brown smoke indicates very high emissions, while colourless smoke means cleaner combustion. Dark smoke usually means too little air, or wood that is too wet. HSY is also clear that rubbish must never be burned in the stove: no paper packaging, no treated or painted timber, no plastic.
Managing air and heat
Air is the throttle of a wood-fired sauna. The Harvia Legend manual says the ash box may be kept slightly open at first to improve ignition, but that too much draught can make the stove red-hot and shorten its life. Once the sauna is warm, closing or reducing the opening limits combustion and wood use.
In practice that means three phases:
- Ignition: vents and damper open, door of the sauna ajar briefly only if your manual permits it.
- Heating: fire burning steadily with bright, lively flames, wood added in small batches.
- Holding: air reduced, fewer logs, the stones now doing most of the work.
Avoid long periods of red-hot running. The Cilindro manual warns that the temperature should generally never exceed 100°C, because overheating the heater and chimney creates a fire hazard. Most people bathe far below that. Helo advises not exceeding the maximum wood amounts listed for the stove, and notes that another batch may be needed in cold weather or for prolonged heating.
How long does it take?
Helo says its sauna is normally ready for bathing in 40 to 50 minutes, and one main load is usually enough for one sauna bath. That is a sensible planning figure for a well-matched stove and room.
Your own time will shift with:
- the outdoor temperature, since a cold winter morning needs longer than a mild August evening;
- the size of the cabin compared with the stove's rated volume;
- how dry the wood is;
- how much stone the stove holds, which also decides how long the heat lasts after the fire dies down.
In a winter log cabin, start earlier than you think you need to. Walking back in at the end of a slow afternoon to find the benches warm to the touch is part of the pleasure.
Chimney and installation rules in Sweden
This is the part to take seriously if you are installing or changing a stove. The rules below summarise official Swedish guidance; your municipality and a qualified sweep or installer have the final word.
- Notification. MSB says a new stove installation requires notification to the municipality's building committee, must follow the Planning and Building Act and Boverket's regulations, and should be inspected by a qualified person before it is used.
- Chimney type. The chimney must be intended for solid fuel and correctly dimensioned. MSB adds that a chimney ending one metre above the roof ridge will in most cases give both good function and fire safety.
- Outlet height. Boverket requires that combustion gases are led away so they do not return to the building, with chimney and flue outlets at least 1.0 metre above the roof covering, together with adequate airflow, combustion air and tight flues.
Boverket treats the chimney as both a health and a combustion matter: it must keep flue gases out of the building while also providing enough draught. A stove that smokes back into the room is a fault to fix, not a quirk to live with.
A practical point for property owners: have the flue swept and checked regularly, and keep the area around the stove clear of towels, wood stacks and anything else that can burn.
Finishing the evening: embers and ash
The fire is not out when the last bather leaves. MSB advises placing ash and soot in a non-combustible container with a tightly fitting lid, standing on a non-combustible surface, and reminds readers that embers can remain for days.
So keep to a short routine:
- Let the fire burn down on its own with the firebox door closed. Never pour water on it.
- Wait until the ash is fully cold before touching it.
- Move it to a lidded metal bucket and keep that outside, on stone or bare ground, away from the woodpile and the walls.
The same care applies to any open flame on a property. Our note for hosts, three checks before lighting a fire pit, follows the same logic of distance, dryness and patience.
Bathing well once the sauna is hot
A wood-fired sauna rewards an unhurried rhythm: a short session, a cool-down, a rest, then another round. Our guide to a private cosy sauna weekend suggests short sessions of 15 to 20 minutes, and our sauna etiquette guide covers how to share the space comfortably. If you are travelling with children, read sauna with children first, and if you have a health condition, check sauna contraindications for travellers and speak to your doctor.
By a lake in the evening, the whole ritual slows down further; we describe it in an evening sauna by a lake.
Our perspective
At Villa Sakis we think of a sauna as part of a slower kind of trip, not a feature to tick off. Our farmhouse is a Swedish log house from the 1700s, surrounded by meadows and pine forest, and the sauna belongs to that setting: timber, quiet, and a lake close by.
What we have come to value is the preparation. Splitting dry wood, laying a fire with care and waiting for the stones to warm teaches the same patience as the countryside itself. Nobody is in a hurry, and the evening is better for it.
That is why we offer the whole house for private use. Your group has the sauna, the forest paths and the lake to itself, so the rhythm of the day is yours: a walk or a training session in the morning, a long lunch, and heat and cool water towards dusk.
If you want to understand how a log house feels before you arrive, our piece on what timber does to a room is a good start.
Christian
Stay with us in Bergslagen
If you would rather arrive to a sauna evening than build one, Villa Sakis is a whole-farmhouse rental in an 18th-century Swedish log house, with a private sauna, lake access and direct access to forest and meadows. It suits families, friends, couples and anyone looking for a restorative, screen-light break. You can read more on our house page or go straight to booking the whole farmhouse.
For a wider picture of the region and the season, our journal explains what to expect from a Swedish countryside vacation, and our private sauna holiday guide for UK travellers covers the practicalities.
FAQ
What is the best wood for a wood-fired sauna?
Dry birch is the classic Swedish choice because it burns cleanly and holds its heat. Alder also works well, and Helo's manual names birch or alder with 12 to 20% moisture. Spruce and pine can be used if dry, but they burn faster and spark more.
How much wood does one sauna session need?
It depends on the stove, so follow its manual. As a guide, start with kindling and add wood until the firebox is about two-thirds full, then top up with a couple of logs at a time to hold the temperature. One main load is usually enough for a single bath, according to Helo.
Can I light a wood-fired sauna indoors in Sweden?
Only with a stove and chimney installed to the rules. A new installation must be notified to the municipality, the chimney must be made for solid fuel, and a qualified person should check it before first use. Ask your municipality's building department about your own property.
What should I do with the ash?
Wait until it is completely cold, then place it in a metal container with a tight lid, on a non-combustible surface outside and away from wood and walls. Embers can survive for days, and you should never pour water on a hot stove.
Is a wood-fired sauna harder to use than an electric one?
It asks for a little more attention, but the method is simple once you know it: dry wood, small batches, steady air. Most people find the fire part of the enjoyment rather than a chore.
Sources
- Narvi installation, use and service instructions
- HSY: Wood-burning sauna stove
- Harvia Legend manual
- Harvia Cilindro 16 manual
- Helo Karhu 20 manual
- MSB: Umgås och trivs framför brasan
- Boverket: Utformning skorstenar
- DoMan: bastu dimensioner, ventilation och dörrar